Quick Answer
To create Roblox UGC items with AI in Customuse, pick the asset category first (accessory, clothing, avatar, or world prop), prompt for shape and style, preview the silhouette before generating the 3D mesh, then resize, fit, and export to Roblox Studio for validation. Category and scale decisions matter more than the prompt.
Watch the Video
The Customuse walkthrough Best AI Tool for Roblox UGC? Create Avatars, Accessories and Worlds builds a full Roblox scene end to end: golden paladin wings, a halo, a paladin character, and a Greek temple environment, with every step from prompt to Roblox Studio handoff.
Roblox UGC is one of the fastest ways to understand what an AI 3D workflow needs to do in the real world. A creator does not only need an attractive mesh. They need the right category, the right scale, a usable poly budget, a marketplace-safe design, a preview on an avatar, and an export path that does not turn the whole project into a file-management exercise.
This walkthrough is based on the Customuse video Best AI Tool for Roblox UGC? Create Avatars, Accessories and Worlds. The video shows a full Roblox scene built from a paladin character, back wings, a halo, and Greek-inspired environment props. The useful part is not the exact fantasy theme. The useful part is the loop: generate, inspect, resize, preview, export, and place the asset in context.
That loop is the difference between an AI toy and a practical asset workflow.
Start with the asset category, not only the prompt
The first decision in the video is not "what should the wings look like?" It is "what kind of Roblox object am I making?" Customuse separates creation modes such as world assets, accessories, tops, pants, clothing, and classic Roblox templates. That matters because Roblox assets do not all follow the same constraints.
A rigid back accessory behaves differently from layered clothing. A world prop can carry a different expectation than an avatar body. A character body has a different budget from a hat, halo, or wing set. If you skip that decision, you can generate something that looks good in isolation but fails when it enters the Roblox pipeline.
For a practical UGC workflow, treat the prompt as the second input. The first input is the destination.
If the asset will be a back accessory, set it up as an accessory. If it will be a world prop, generate it as a world asset. If it will become a character, use a workflow that respects avatar requirements. This is where Customuse is useful for Roblox creators: the interface is not just a generic text-to-3D box. It asks what the output is for.
The reason this matters is that each Roblox category carries its own hidden contract. Pick the wrong one and you will not find out until the upload validator rejects the file or the item attaches to the wrong body point. Use the table below to map the assets from the video to the decision each one forces before you write a single word of prompt.
Asset (from the video) | Roblox category | What the category decides | What to check first |
|---|---|---|---|
Golden back wings | Back accessory | Attachment point, rigidity, single-mesh limit | Does it sit flush to the spine attachment? |
Halo | Hat / head accessory | Head offset, scale relative to face | Does it float at the right height above the head? |
Paladin armor look | Layered clothing or avatar body | Cage fit, deformation under animation | Does it deform cleanly when the avatar walks? |
Temple columns, ruins, rocks | World asset (game prop) | Free of avatar rig constraints, scene scale | Is it lightweight and readable when tiled? |
Clouds and trees | World asset (dressing) | No rig, no marketplace accessory validation | Does it stay cohesive next to the other props? |
Reading this top to bottom is faster than learning it the hard way. A back accessory and a hat are both "accessories" in casual speech, but Roblox treats them as different attachment categories with different scale expectations, so the category choice is really an upstream design decision rather than a dropdown you set at the end.
Use previews to choose before generating the final model
In the walkthrough, the creator prompts for stylized golden and white wings, then reviews image previews before generating the 3D model. That preview step is easy to underrate. It saves credits, saves time, and gives the creator a chance to pick the silhouette that actually matches the avatar.
For Roblox UGC, silhouette is often more important than micro-detail. The item has to read from a distance, fit a character, and survive marketplace browsing. A halo that is technically detailed but visually unclear is worse than a simpler version that reads instantly.
The same principle applies to world assets. The later temple scene uses clouds, rocks, trees, ruins, and columns. None of those props need to be a cinematic hero asset. They need to be readable, stylized, lightweight, and cohesive when arranged together.
Inspect scale and placement before leaving the workflow
One of the strongest moments in the video is the resize and reposition step. After generating the wings, the creator opens the asset, aligns it to the character, checks it against different shaders, and previews it in Roblox. That is exactly the kind of workflow step that generic generators often leave to the user.
For rigid accessories, placement is not a cosmetic detail. A back item that floats too far from the body, clips through the torso, or sits at the wrong angle may look broken even if the mesh itself is good. Customuse lets the creator adjust that fit before downloading or sending the design onward.
A simple pass/fail test helps:
Does the item read clearly on the avatar at normal camera distance?
Does it clip through the body in the default pose?
Does the attachment category match the actual use case?
Does the item still look good with different lighting or shader previews?
Is the poly count appropriate for the Roblox target?
That last point is important. The video calls out Roblox accessory limits, including the need to stay within marketplace validation constraints. AI generators that ignore platform rules can create a beautiful failure. A Roblox-first workflow has to care about validation from the start.
Build characters and environments from the same production loop
The video does not stop at accessories. It creates a paladin-style character and then builds a small environment around it: temple ruins, clouds, rocks, and decorative props. That is a useful signal for broader AI 3D creation. The best workflows are not only asset generators. They help creators move from a single object to a scene.
For Roblox, this means a creator can test whether a UGC idea fits a game world. For game developers outside Roblox, the same pattern applies. Generate a character. Generate props that belong around the character. Bring them into the engine. Review scale, style, and composition together.
That is why this kind of workflow matters beyond Roblox. The strategic problem in AI 3D is not "can the model generate one mesh?" The problem is "can a creator produce a connected set of assets that belong in the same world?"
In the temple sequence specifically, the props share a visual language because they were generated and judged together: the same stylized golden-and-stone palette runs through the columns, the ruins, and the halo, so the scene reads as one place rather than a pile of unrelated downloads. That coherence is the part a single hero mesh can never give you. A creator who generates one perfect column and then bolts on mismatched rocks ends up with a scene that looks assembled by committee. The production loop, where you generate, place, and re-judge against everything already in the scene, is what keeps style consistent across a set.
What AI does well and where you still own the work
It helps to be honest about the division of labor. AI generation in Customuse is strong at the blank-canvas problem: it gives you a wing silhouette, a halo shape, or a temple column in seconds instead of an afternoon of modeling. It is not a substitute for judgment about scale, marketplace fit, or originality, and it is not a guarantee that a mesh will pass Roblox validation untouched. The table below separates the two so you can plan a realistic UGC session.
Step in the loop | Where AI carries the load | Where you stay in control |
|---|---|---|
Concept and silhouette | Generates multiple shape options from a prompt | You pick the silhouette that reads on an avatar |
3D mesh | Produces a usable base mesh fast | You inspect poly count against the Roblox target |
Fit and scale | Aligns and previews on the character | You confirm no clipping and correct attachment |
Export | Hands off FBX/GLB to Roblox Studio | You validate, test animation, fix what fails |
Marketplace | Speeds production volume | You own originality, demand, and policy compliance |
The pattern is consistent: AI removes the slow, repetitive start of each step, and the creator keeps the decisions that determine whether the item ships. That is the realistic version of an AI UGC workflow, and it is also why a tool that only generates a mesh is not enough.
Roblox Studio handoff still matters
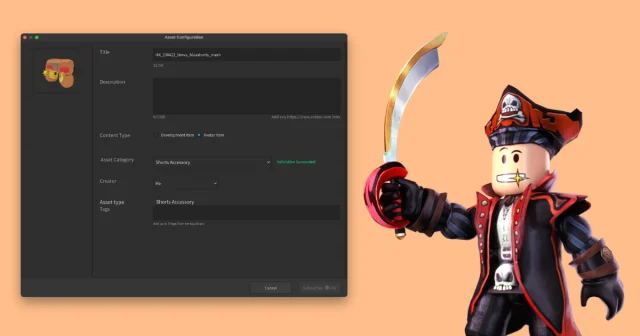
The video shows a direct Roblox Studio step for the character. The creator imports the FBX through Avatar Setup, selects the body type, waits for setup, previews animations, renames the model as StarterCharacter, and tests it in play mode. For the accessories, the workflow uses Roblox Studio's accessory fitting tool, chooses the relevant categories, and attaches the results to the starter character.
This is an important production point. AI can compress the creation loop, but engine handoff still needs review. You still have to test the avatar. You still have to check animation. You still have to see how accessories attach to the real character. You still have to arrange world props in context.
The best expectation is not "AI replaces every step." The better expectation is "AI removes a lot of blank-canvas labor so the creator can spend more time judging, placing, and improving the result."
A practical workflow for Roblox UGC creators
Use this article as a working sequence:
Choose the destination first: accessory, layered clothing, avatar body, or world asset.
Write a prompt around shape, style, color, and role in the game.
Use previews to pick the strongest silhouette before 3D generation.
Generate the 3D asset and inspect it in Customuse.
Resize, reposition, and preview on an avatar when the asset is wearable.
Export or upload into Roblox depending on the category and your account setup.
Test in Roblox Studio before treating the asset as finished.
Check Roblox policies, originality, moderation requirements, and marketplace constraints before attempting to sell anything.
That final step is not optional. Marketplace success depends on originality, demand, compliance, and quality. AI can help with speed, but creators still own the creative and policy responsibility.
Why this belongs in the broader Customuse story
Roblox is not the whole Customuse brand, but it is a strong proof surface. It shows why AI 3D needs more than a generator. The workflow needs categories, constraints, previews, editing, export, and engine handoff.
That is also the broader direction of Customuse as an AI 3D production workspace. The same logic that helps a Roblox creator build wings, a halo, a character, and a temple scene also applies to game assets, cinematic props, VFX scene references, and production workflows. The value is not only that Customuse can make something from a prompt. The value is that the work keeps moving after the prompt.
FAQ
Can you make Roblox UGC items with AI?
Yes. You can prompt for the shape, style, and color of an accessory, clothing piece, avatar, or world prop, preview the result, and generate a 3D mesh. The catch is that the AI mesh still has to clear Roblox's category constraints and marketplace validation, so the workflow that handles category, scale, fit, and export matters as much as the generation itself.
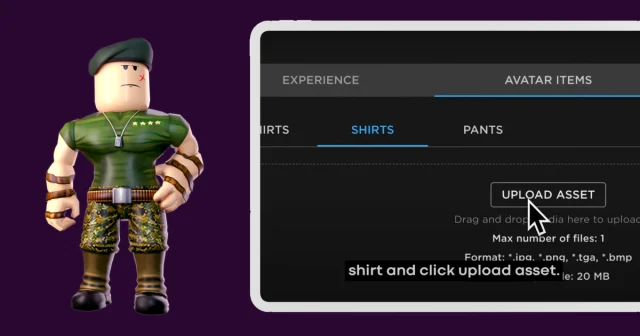
How do I upload an AI-generated item to Roblox Studio?
For a character, the video imports the FBX through Avatar Setup, picks the body type, waits for setup, previews animations, and renames the model to StarterCharacter before testing in play mode. For accessories, it uses Roblox Studio's accessory fitting tool, picks the matching category such as back or hat, and attaches the item to the starter character. Always test in play mode before treating the asset as finished.
What poly count do Roblox UGC accessories need?
Roblox enforces per-category limits and runs a marketplace validation pass, so an accessory has to stay within those triangle and texture constraints to upload at all. Check your asset's poly count before export rather than after a rejected upload. A clean, readable silhouette at a sensible poly budget beats a high-detail mesh that fails validation.
Can I sell AI-generated Roblox UGC on the marketplace?
You can, but speed of creation is not the same as marketplace success. You still own originality, demand, quality, and policy compliance, and Roblox moderation applies to AI-made items the same as anything else. Use AI to produce volume, then judge each item against demand and the marketplace rules before listing it.
Is Customuse better than Roblox's built-in AI generation for UGC?
They solve different problems. Roblox's built-in generation is convenient and lives inside Studio, which is hard to beat for quick in-engine ideas. Customuse is stronger when you need category-aware setup, image previews before committing credits, resize and fit controls, and a connected loop that takes you from a single accessory to a full scene. For a serious UGC pipeline, the deciding factor is usually how much control you want before the engine handoff, not raw generation alone.