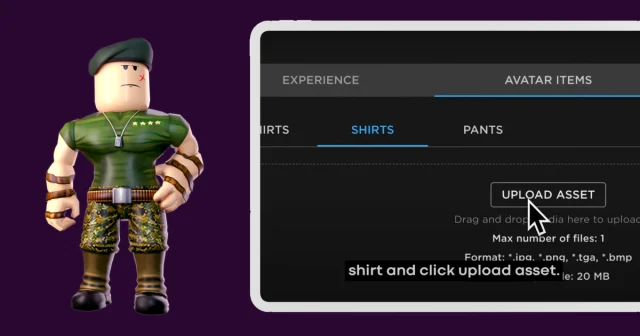
Quick Answer
To take an AI character to a game-ready asset with skins, separate it into modular parts (body, armor, wings, weapon), generate a clean low-poly base, reuse one body geometry across texture variants, fix UVs in Blender, rig with a humanoid skeleton, then test materials and animation in-engine.
Watch the Video
The walkthrough From AI to 3D Game Character with Skins - Full Tutorial shows a full build inside Customuse Nodes: a stylized character with armor, wings, a weapon, gold and crimson skin variants, Blender cleanup, an AccuRIG humanoid rig, and Unreal Engine 5 setup, including the manual touch-ups.
A serious AI character workflow should do more than generate one full-body mesh. Game characters often need modular parts, texture variants, skins, weapons, wings, rigging, engine materials, and some manual cleanup. The question is not whether AI can make an attractive image. The question is whether AI can help build a character system that behaves like a game asset.
This article is based on the video From AI to 3D Game Character with Skins - Full Tutorial. The tutorial uses Customuse Nodes to build a stylized game character with armor pieces, body texture variants, wings, a weapon, Blender cleanup, material work, rigging, and Unreal Engine setup.
It is one of the more useful Customuse proof videos because it shows both the exciting parts and the manual touch-ups. That is exactly the balance AI 3D content needs.
Begin with a clean character reference
The tutorial starts with a final character concept, then uses image-edit and optimization nodes to create a clean A-pose reference. The creator removes wings and weapons because those will be built as separate parts. That decision matters. If everything is baked into one mesh too early, the character becomes harder to rig, skin, customize, or animate.
For game characters, clean separation is often more important than one-click completeness. The body, armor, helmet, weapon, wings, and accessories may need different geometry, different textures, different materials, or different animation behavior. A modular character pipeline starts by deciding what should be separate.
In Customuse, the creator uses annotation and asset extraction to isolate parts. This is a strong example of AI as a workflow assistant rather than a single-output generator. The creator is not only asking for "a character." They are directing which pieces should become assets. An A-pose (or T-pose) reference also gives the rigging step a predictable starting point later: limbs are spread, the silhouette is readable, and the auto-rigger has clean joints to detect instead of guessing through overlapping armor.
Generate the body and variants with the final use in mind
The body becomes the base for multiple skins: original, gold, and crimson. The tutorial uses image variation to create color versions, then generates a low-poly model. This is how skins usually work in games: one geometry can support multiple material or texture sets.
That is an important distinction for AI character creation. If every skin is generated as a totally different mesh, the game pipeline becomes harder to manage. Each new mesh means new UVs, a new rig, new collision, and new LODs to maintain. If the same geometry supports several texture sets, the result is far more reusable: you rig once, you author LODs once, and a skin becomes a swappable material rather than a whole new character. The tutorial later previews those texture swaps in Blender, showing how the same body can take different color textures.
For production, this is where UV quality matters. The creator downloads the GLB, brings it into Blender, cleans up problem areas, mirrors the body, unwraps UVs, and exports the fixed model back into the Customuse workflow. This is a refreshingly honest step. AI-generated UVs are not always enough for professional work. When the character matters, a human cleanup pass can make the asset easier to texture, optimize, and maintain. Good UVs are also what make the gold and crimson variants align cleanly: shared, sensible UV islands mean a recolor or a metallic pass lands in the same place on every skin instead of drifting between versions.
Use AI for parts, but review every part
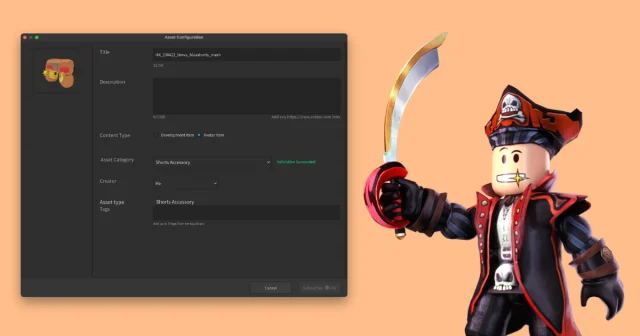
The tutorial extracts armor pieces, creates low-poly versions, adjusts poly counts per object, reviews wireframes, regenerates weak parts, and textures the pieces. That is the correct workflow. AI is fast, but not every generated part will be right on the first try.
Different parts deserve different budgets. A small bracer does not need the same polygon count as the body. A helmet may need more detail than a hidden armor plate. Wings and weapons may need their own texture passes. The creator makes those decisions inside the node graph, then reviews the results one by one. Reviewing the wireframe before texturing is a habit worth copying: a part that looks fine when shaded can still hide pinched topology, non-manifold edges, or wasted triangles that only show up in the wires. Catching that before you spend time on textures and rigging saves a full round-trip.
This is where Customuse's Nodes Editor matters for teams. A visible graph lets creators branch, regenerate, compare, and keep the logic of the character build intact. The character is not a mystery file from a black-box prompt. It is a set of connected decisions. If the crimson skin needs a tweak three weeks later, the node that produced it is still there to re-run, instead of a lost prompt nobody remembers.
A status checklist for each part
Treating "the character" as one deliverable hides where the real work is. It helps to track each part against the same checklist, because a body and a bracer reach "done" at different speeds.
Part | Modular? | Own poly budget | UV pass needed | Texture variants | Rig role |
|---|---|---|---|---|---|
Body | Yes (base mesh) | High | Yes, manual cleanup | Original / gold / crimson | Full humanoid skin weights |
Armor pieces | Yes, extracted | Medium per piece | Per piece, review wires | Match active skin | Parent to body bones |
Helmet | Yes | Medium-high | Yes (emission mask) | Emission + base | Head bone |
Wings | Yes, separate part | Medium | Yes | Optional | Extra bones or physics |
Weapon | Yes, separate part | Low-medium | Yes | Optional | Hand socket / attach |
The point is not the exact numbers, which depend on your target platform. The point is that "game-ready" is reached part by part, and a checklist keeps a fast AI workflow from shipping an untested mesh.
Multiplayer makes the workflow feel closer to production
The video includes a moment where another person helps create the wing and weapon on the same canvas. That is not a small feature. Most AI generation tools feel single-player, while game production is collaborative. Character design, modeling, texturing, rigging, and engine integration usually involve multiple people or at least multiple passes.
Real-time multiplayer turns the canvas into a shared production surface. One creator can work on the body while another explores weapons. One person can generate material variants while another checks mesh quality. That is closer to how game assets are actually made.
For SEO, this is a strong Customuse differentiator. It is not only "AI makes a character." It is "AI character creation happens in a visible collaborative workflow."
Blender still plays a role
The tutorial spends meaningful time in Blender assembling parts, mirroring symmetrical objects, aligning armor, removing hidden geometry, setting up materials, connecting noise textures to roughness and metallic inputs, and painting an emission mask for the helmet. This is exactly the right message for serious creators: AI reduces the blank-canvas burden, but standard 3D tools still matter.
That should not be seen as a failure. A useful AI 3D workflow should cooperate with Blender, Unreal, Unity, and other production tools. The goal is not to pretend every asset emerges perfect. The goal is to make the hard parts faster and the remaining manual work more focused. Wiring a noise texture into roughness and metallic, for example, is a few minutes of node work that gives the armor a worn, physically grounded look no single generation pass would have nailed exactly to taste.
In this workflow, Blender is used for judgment and assembly, not for starting from zero.
Rigging and Unreal Engine setup complete the proof
After the character is assembled, the tutorial uses AccuRIG for a humanoid rig, reviews weights, mentions extra wing rigging or physics, and exports for Unreal Engine 5. In Unreal, the creator retargets animation, replaces the third-person character, sets up physics, builds materials, configures emission, and prepares material swaps for skins.
This is the right endpoint. A character is not finished when it looks good in a model viewer. It becomes a game character when it can stand in the engine, animate, use materials correctly, and support the gameplay or cinematic role it was made for. Retargeting matters here: a clean humanoid rig is what lets the new character borrow Unreal's existing animation set instead of needing bespoke motion, and weight review is what stops the armor from tearing through the body when those animations actually run.
If you are using this workflow, separate the asset into three status labels. "Concept-ready" means the look is promising. "Pipeline-ready" means the parts, UVs, textures, and rig path are workable. "Game-ready" means the character has been tested in engine with animation, materials, scale, and performance considered. The skins deserve the same test: a gold variant that reads well in a viewer can blow out under in-engine lighting, so swapping materials in Unreal and checking them in real light is part of finishing, not an afterthought.
Why this workflow is strategically important
This tutorial is a strong example of the brand Customuse should be known for: not only prompt-to-3D, but AI 3D production workflow. It combines reference editing, part extraction, low-poly creation, texture generation, reusable skins, collaborative nodes, Blender cleanup, rigging, and Unreal handoff.
That is the conversation Customuse belongs in alongside Meshy, Tripo, Sloyd, Kaedim, and other AI 3D tools. Roblox's own built-in generation is also genuinely useful for getting a first asset fast inside that platform. Model quality matters across all of them, but workflow quality matters more as soon as a creator tries to build a real, multi-part, skinnable game character that has to survive rigging and an engine.
The best way to judge this workflow is not by asking whether every step is fully automatic. It is by asking how much faster a creator can move from idea to a testable, customizable character in engine. On that question, the tutorial gives Customuse a strong answer.
FAQ
How do I turn an AI image into a 3D game character?
Start from a clean A-pose reference, split it into modular parts, generate a low-poly base mesh, then handle UVs, textures, rigging, and engine setup as separate steps. The Customuse tutorial above walks through each one, from part extraction to Unreal Engine 5. The image is only the starting point.
Can one character mesh support multiple skins?
Yes, and it should. Build one body geometry with clean shared UVs, then drive skins as different texture or material sets, the way the tutorial creates original, gold, and crimson variants. Generating a separate mesh per skin multiplies your rigging, LOD, and maintenance work for no real gain.
Do I still need Blender if I use AI to make characters?
For a serious game character, usually yes. The tutorial uses Blender to fix UVs, mirror the body, assemble parts, remove hidden geometry, and wire materials. AI removes the blank-canvas grind, but Blender is still where you apply judgment and assembly before the asset is dependable.
How do I rig an AI-generated character for a game?
Export a clean, A-pose body, then use a humanoid auto-rigger such as AccuRIG to place a skeleton and skin weights. Review the weights so armor does not tear during animation, add extra bones or physics for parts like wings, then retarget existing animations in your engine.